Thursday, December 5, 2013

Recreation of a Recreation!

Today I have a recreation of something I already recreated last week lol. I loved my manicure inspired by The Lacquerologist so much I did it again. In less than a week! I really, really liked it the first time so I did it twice in a week which is unheard of for me!

This time I used two coats of Sinful Colors Opening Night and two coats of Sinful Colors Inkwell. I then did the stripes down my ring finger with Essie Good as Gold. The contrast between the teal and blackened plum wasn't as stark as it was in the previous manicure, so I'm not sure I loved this combination as much.


What do you think of this combo?

Thanks for reading!
 

Tuesday, December 3, 2013

Girly Glitter Gradient

Girly Glitter Gradient! Say that three times fast!!

I think the title today is pretty self explanatory, so here's the details. I used two coats of Sinful Colors Starfish and then did a glitter gradient with Sinful Colors Fantasy. Fantasy was really runny and hard to use for the gradient, so my nails were pretty thick at the cuticle. Next time I use it for a glitter gradient I'd use a sponge instead of just painting it on.


Thanks for reading!

Sunday, December 1, 2013

Fall Themed Nails

One quick fall themed post before fall has completely disappeared! I know winter has already arrived in some places but it hasn't here yet so I thought I'd sneak these in before they're just a reminder of better, less cold times, lol.

All fingers are two coats of Sinful Colors Ruby, Ruby (it's such a juicy, squishy colour!) except the ring finger which is two coats of Sinful Colors Nirvana. The ring finger is stamped with Bundle Monster plate BM208 and Essie as Good as Gold.


It isn't too cold out yet for this is it?!

Thanks for reading!!

Thursday, November 28, 2013

Inspired By…The Lacquerologist!

I love looking at other nail blogs…it's just so fascinating to see what other people come up with and of course, the swatches add to my never-ending have to have it list, and sometimes end up inspiring a bottle in my ever growing pile of polishes!

A looong while back The Lacquerologist posted a manicure I ADORED, you can see it here. I love her work in general, but this one really stuck in my head and I finally had to try it out. Here's my interpretation of the her awesome manicure, I used two coats of Sinful Colors Shock and Awe on my pinky, and two coats of Sinful Colors Nirvana on all the other fingers, except the ring finger. On the ring finger I did half of the nail in Shock and Awe and the other half in Nirvana. Then I added in the stripes down the middle using Sinful Colors Inkwell.

I loooooved this manicure, it was so bright and eye-catching and I got lots of compliments on it when I was wearing it too :)


Really random, but my bottle of Nirvana says Matte on the label…but it dried shiny, what's up with that?!


Thanks for reading everyone!

Tuesday, November 26, 2013

My Nemesis Stamp

This manicure features a stamp that I can never ever get to work properly no matter how hard I try! Does anyone else have an image like this, where you just can't for the life of you get it to work?!

Stripes…my stamping nemesis. Doesn't matter what brand I try, none of them work for me. I ordered a squishier stamper so hopefully that will help, I'll see when it gets here. Any other tips for mastering this stamp?

This disaster of a manicure is one coat of Sinful Colors Southern Belle and three coats of OPI Solitaire on the pinky. I used Konad white and CH10 for the stamping. It's not perfect and I can't seem to get it right, but I wanted to show it anyways. This blog is about nail art, success and failures included!


Any helpful suggestions out there?

Thanks for reading!

Sunday, November 24, 2013

Sinful Colors Vacation Time with Love Birds

Hi everyone!!

Today I have a fairly simple manicure for you that I really enjoyed wearing. The simplicity of it was refreshing.

I started with one coat (!) of Sinful Colors Vacation Time on all my nails. It's a smooth, dusty brownish-pink colour, it reminds me of my favourite blush, lol. My ring finger and thumb are stamped with BM-H22 and Sinful Colors Coffee.


Since Vacation Time was opaque in one coat I'm going to have to experiment with it for stamping purposes. I love finding new, unexpected stamping polishes, can't wait to see if it will work!!

Thanks for reading!

Thursday, October 31, 2013

Halloween Blood Drips!

Happy Halloween everyone!

I have my current Halloween manicure for you today!! I've always wanted to do bloody cuticle nails for Halloween so here they are.

I used 2 coats of Zoya Avery for the base, it's pretty close to my skin tone. Not quite perfect but pretty close! I then freehanded the blood with China Glaze Drastic which is one of my favourite reds!


What's on your nails for Halloween?

Thanks for reading, and I hope you have a fantastic Halloween!!

Wednesday, October 30, 2013

Halloween Ruffian

Hello lovlies!

Today I just have a quick manicure for you. I write my last midterm today so I haven't had a ton of time to do my nails, in fact I've been wearing this manicure for 4 days now and it's just showing tip wear now, phewf! I'm so happy it's lasted this long so I can concentrate on studying.

Keeping with the Halloween theme I have a sorta-ruffian manicure. I say sort of because the bottom color continues up the sides of my nails but in a true ruffian it wouldn't.

I used two coats of Sinful Colors Citrine for the orange and one coat of Sinful Colors Black on Black for the top color. Next time I would make the black as smooth as possible with a small paintbrush, but I just didn't have time this weekend to let my perfectionism get in the way!


I'm very excited for this evening, no more studying! Which means I can squeeze in one more Halloween manicure for tomorrow :)

Thanks for reading!

Thursday, October 24, 2013

China Glaze Howl You Doin' (2013 Halloween Monsters Ball Collection)

Hi everyone!

Just a simple polish post today. Don't despair, the polish is amazing! And it's Halloweeny! Which is what I'm going for from now up to Halloween. I'm embracing the holiday on my nails!!

It's China Glaze Howl You Doin' form the 2013 Monsters Ball Halloween Collection. It's a deep purple crelly with copper and blue flecks in it. I love this polish it reminds me of some sort of magical liquid bubbling away in a witchs' cauldron!

Doesn't it look all mystical and spell casting?! I wore it for a day shiny and then I mattified it.


I think I liked it better matte, it looked dark in most lights, but then a little sparkle would peek through. It was really interesting. Which do you like better?

Thanks for reading!!

Saturday, October 19, 2013

Random Nail Plate - Halloween Themed!

Wow...I don't know how I got so lucky. My very first random plate draw and it's holiday appropriate! Hurray for randomness! Note: I will not be so fond of randomness when say a Christmas plate comes up in January, but for now I'm happy with it!

So the plate that came up on the very first draw was BM-222. Which is this little guy here:


I quite like the full nail designs on this one, the scrolly one in the bottom is so nice. And the right side is so intricate too, either would make a very classy manicure. I've actually been itching to try out the top image to make Dalmatian nails. The butterfly would be cute for some springy nails, but since it's fall here I figured I would pass on that one. The left hand full nail image was out because, well, it's not Christmas yet. But as I'm sure you got from the title of the post, I decided to use the little pumpkin to design my manicure around. This is definitely not the sort of image I'd usually gravitate towards (I really like the full nail images on this plate), but I figured I should embrace the Halloween spirit!

So today I have a Halloween manicure for you featuring the little pumpkin from BM-222. Since it's a skittles manicure I'll list them out finger by finger, it's just easier that way! All the stamping is done with Wet N Wild Black Creme.

  • Pinky - 2 coats of Essie Chinchilly with a glitter gradient of Sinful Colors Black Magic (sidenote: I LOVE this glitter gradient! It looks even better in real life. I think it would look really awesome to do a black to white ombre with this glitter over it in a gradient)
  • Ring - 3 coats of Sinful Colors Cloud 9 stamped with the pick of the day BM-222!
  • Middle - 2 coats of Essie Chinchilly stamped with BM-H08
  • Pointer - 3 coats of Sinful Colors Cloud 9 stamped with BM-H06
  • Thumb - 2 coats of Essie Chinchilly stamped with BM-213

Look at that gradient, yummy! It worked way better than I ever imagined.
And now a picture of the claw pose as awkward as it is to show some thumb love!


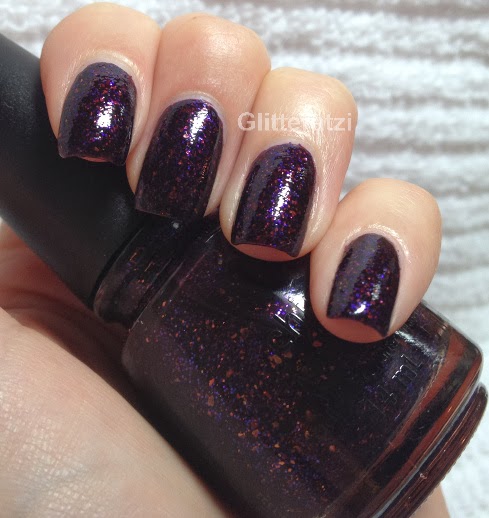
A close up of the glitter gradient in all it's yummy shimmery goodness! Black Magic is from Sinful Colors' 2013 Halloween collection - run out and get it now if you don't already have it! It's amazing, I love it!


Thanks for reading!!!

Friday, October 18, 2013

I'm back and I'm sorry!

Hi everyone,

If you're still following me I would like to say thanks for your patience and I'm very very sorry that I haven't been around. I've been thinking about the blog a lot and feeling really guilty about neglecting it.  In September I started pursuing a masters degree, and moved to another country to pursue it. I didn't expect it to be so much work to move and get set up and make new friends and go back to school so I really underestimated my time commitments. But I'm back, I've got my time management under control and set some time aside for blogging! And I'd like to use this post to set a few goals for myself for the blog. I figure if I put everything in my head out there into the world I might actually start to do it!!

I find goals easier to read in list format so here we go:

  • Post 3 times per week - I always have polish on my nails so all I have to do is just snap some photos and put them up here! I'm not going to stress over putting up only nail art, whatever is on my nails can go up, even it's just a boring old plain color. I like to look at swatches so why not post one if that's what I'm wearing.
  • Work my way through my stamping plates - I set up a spreadsheet so I can randomly chose one of my plates when I'm lacking inspiration or just can't decide what to do. Whatever plate gets chosen gets used in the next manicure. I'm hoping to start this tomorrow! I have a lot of plates though so this will take a long time. Also, it will make me use the plates I'm not that fond of...ahem...Gals and french tips!
  • Try out one new technique per month - there's lots of things out there I want to try out but have been putting off, what better time than now?!
  • Improve my cuticle care - with life getting in the way so much lately I've still had polish on my nails, but my cuticles have gone waaay down on the list. I'm hoping to get them back to good shape instead of the slightly overgrown dry mess they are now.
If you made your way all the way through that thanks and congratulations! It was a lot I know.

I hope I can stick to these goals and be around these parts much more frequently. 

See you soon :)


Thursday, August 1, 2013

OMD 31 Day Challenge - Day 22 - Animal Themed

Hi everyone! I'm back today...I've been wearing plain chipped red polish for over a week since everything's been so busy. It feels really awesome to be back in 'fancy nails'!

So today I have the very late Animal Themed Day 22 of the OMD Challenge. Rawr! Animal Themed!!

My pointer and ring finger are two coats of OPI I'm Suzi & I'm A Chocoholic. My ring and pinky fingers are three coats of an unnamed Color Club pale nude with grey/pink undertones. It's then stamped with the leopard print design from Bundle Monster plate 221 and Wet n Wild Black Creme. Then to jazz it up a bit I filled in the spots with Nubar Fire Sparkle and a dotting tool.

RAWR! Red hot leopard! Lol.


Thanks for reading!!

Check out the other animal inspired manicures here


Wednesday, July 31, 2013

A Quick Update

Hey everyone!!

Sorry I've been MIA for so many days now. Life has gotten way busier than I expected it to and unfortunately right when the challenge got the most exciting!

I'm back now though and I'll have an actual nail post for you tomorrow. I'm determined to finish up the challenge even though it will be late. It has a silver lining though...for the last day (recreate your favourite by someone else) I will have the pick of the litter since everyone else will be done lol!

I also have some exciting personal news that I can't wait to share but I'm saving that for the end of the challenge so you'll have to be a bit patient!!

See you tomorrow...with nails!!! :)

Monday, July 22, 2013

OMD 31 Day Challenge - Day 21 - Stamping

Stamping!! Yay! I like stamping!! So many possibilities for one mani!

I was really inspired by my day 17 gradient. It really reminded me of the color of the sky at dusk. So I recreated the colors in another gradient using China Glaze Urban-Night and China Glaze Traffic Jam and then I used Bundle Monster 205's butterfly image to have the butterflies fluttering into the night. I didn't topcoat after the stamping because I liked the way the butterflies looked matte against the shininess of the sky.


Thanks for reading!

Don't forget to check out the other challenger's manis here


Sunday, July 21, 2013

OMD 31 Day Challenge - Day 20 - 3-D Nails

Yay! Day 20! I should (hopefully) get all caught up tomorrow.

Day 20 is one of my favorite mani's so far this challenge. I really enjoyed it and it turned out exactly the way I wanted it to.

I started with three coats of Zoya Nyx (did I mention I love textured polishes, cuz I do. I really, really love them!). Even though it takes three coats which is a total drag I love how sparkly and delicate the blue is. When it was dry I added a tiny half flower in the cuticle area using round and oval shaped studs. I loved how textured the whole mani was between the textured polish and the studs.


Thanks for reading!!

Check out the other 3-D mani's here


OMD 31 Day Challenge - Day 19 - GLITTER

ZOMG! GLITTER!!!

Day 19 of the OMD 31 Day Challenge is glitter! I love glitter, lol. I did a glitter gradient using my new favorite pink China Glaze Innocence (told you it would be making another appearance very soon! lol!).  I did four coats of Innocence and then sponged on a glitter gradient using Nubar Violet Sparkle. Violet Sparkle was super opaque! I ended up needing to go further down my nail than I had planned since it was so opaque. Violet Sparkle is a gorgeous glittery saturated purple, my pictures don't do it justice.


This was so blingy and sparkly! I loved wearing it!!

Thanks for reading!

Check out the other glittery mani's here


Saturday, July 20, 2013

OMD 31 Day Challenge - Day 18 - Delicate

Cruising on to Thursdays manicure now!!

Day 18 was delicate; whenever I think of delicate I always think of a soft, light color. Thus I have a light pink manicure. I used four coats of China Glaze Innocence, which is a gorgeous color that was sitting in my untrieds pile and I've now fallen in love with it! And I will be using it again, very, very soon! ;)

Once Innocence was dry I added in a tiny little bow on my ring finger as an accent using Konad White and Cheek plate 15. What's more delicate than pink and bows?! Then, just because, I had to add a tiny rhinestone to the centre of the bow just to give it some zip. I really loved this manicure, it would make a lovely palette cleanser with a bit of zing!


Thanks for reading!! I'll be back tomorrow with some more catch-up posts!

Check out the other delicate mani's here


OMD 31 Day Challenge - Day 17 - Gradient

Whoops....this was supposed to be the mani for Wednesday but I'm only posting it today! Silly life getting in the way of posting. Anyways, I know I'm super far behind but I'm hoping to get caught up in the Challenge over the next couple of days so expect lots of posts.

My gradient manicure is pink and purple and girly all over! It's actually the first gradient I've done that I've been happy with, so now I'm excited to do more!! I started with a quick base of white and then I sponged on China Glaze Urban-Night and China Glaze Traffic Jam. Both colors are gorgeous, but I had a hard time capturing them in photos. Thus I took a bazillion photos of this manicure, so here's the ones I thought were truest to color! They look sort of speckly in the photos, but they weren't in real life, the colors were opaque and no white was showing through.


I can't wait to do another gradient! Thanks for reading :)

Check out the other gradient manicures here